Software Configuration
Overview
This document describes how to configure the installed software so that all components work together and the most important basic settings are available. Please note that depending on the configuration of the simulator, other performance settings may also be useful.
In Premium Plug & Fly versions, the software is already pre-configured. In this case, you do not need these instructions.
Preconditions
Before you start make sure that your computers have an up-to-date Windows 11 installed, you have alle necessary software installed and you did all wiring of displays and USB connections. You will also need a stable internet connection. Ideally you have all computers be placed at its final position in the room, so you do not need to unplug cables any later again.
Preparation
Please give the VISUAL PC and the AVIONICS PC a fixed IP address. These addresses are required so that the installed software components can communicate with each other efficiently.
https://www.google.com/search?q=how+to+set+fix+ip+address+in+windows+11

If you are unfamiliar with DNS-settings please use 8.8.8.8 and 8.8.4.4.
Also set the computer firewall to "Private network".
Skalarki Profiler
When you open the profiler, the existing panels should show a green "YES" and the profiler should run in "SDK Mode".

In case of any trouble with the panel please follow the instructions of our Trouble Shooting Guide after reading this guide.
Stop the SDK mode and check the settings.

Make sure you select the correct Flight Simulation software.
Select the appropriate settings for your configuration. Make sure that you have ticked all the panels and functionalities available in your setup.
Calibrate the T-gauge settings by carefully changing the values.
Be careful when selecting the values for the min and max position of the T-gauge pointers. If used incorrectly, the gauge pointers may break.

Select the appropriate settings for your configuration.

Select the appropriate settings for your configuration.
Please ensure that the settings for the Maintenance Panel (MAINT) in particular are correct. Otherwise, the aircraft's engines may not start.

Select the appropriate settings for your configuration. Usually there is no need to change anything here.
Do not be confused by the names of the TQs. These reflect the year of development. And not the year of production. You will only ever receive the latest generation of devices from us.

Select the appropriate settings for your configuration. Usually there is no need to change anything here.

In case of any trouble with the panel please follow the instructions of our Trouble Shooting Guide.
ProSim A320
In this step, ProSim A320 is configured. Please start ProSimA322-System for this.
Firewall
Depending on your Windows environment, you may have to answer a firewall request.
Please allow access from ProSimA322-System, otherwise the components will not be able to communicate with each other.

Settings
Select the appropriate settings for your configuration. Usually there is no need to change anything here.

If you have a SimbriefID, you can enter it here. This is useful for importing flight plans created via Simbrief directly into the FMS.

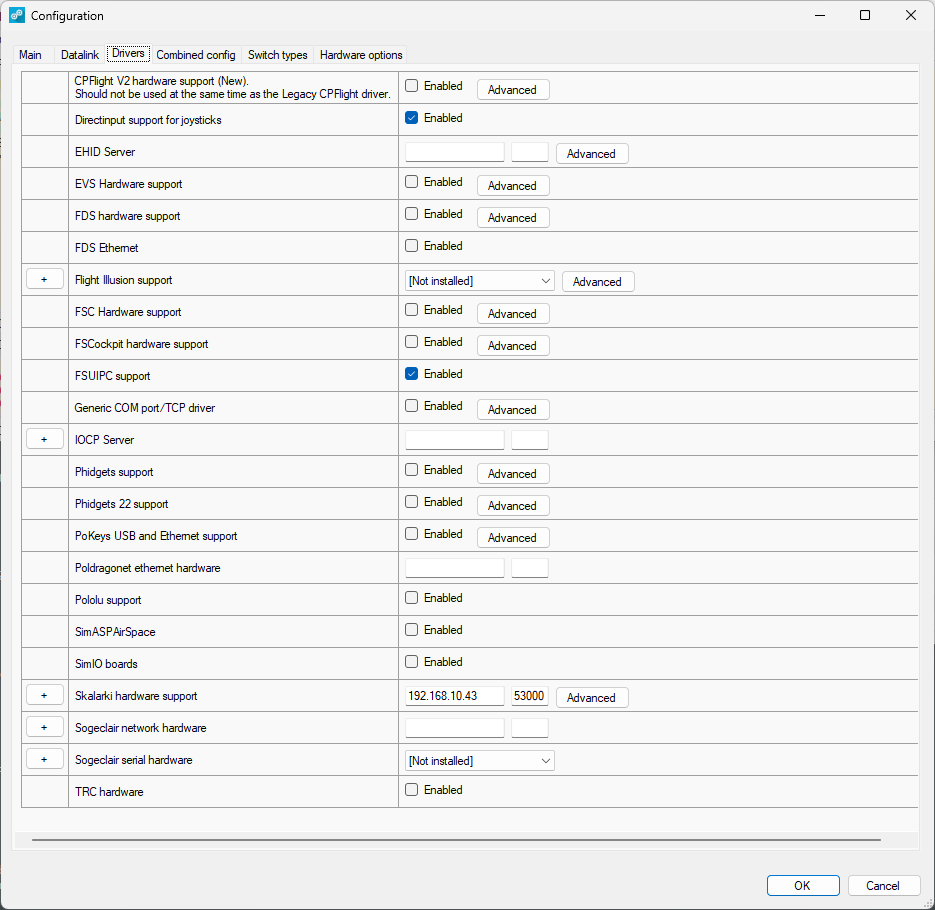
Select the appropriate settings for your configuration. Make sure to tick the box "Directinput support for joysticks".
If you are using add-ons based on FSUIPC, you can tick the box for "FSUIPC support" here.
Enter the IP address of the computer on which the Skalarki Profiler is running and to which the hardware is connected below. This is usually the VISUAL-PC.
Make sure that you enter the correct IP address and answer any firewall queries.

Select the appropriate settings for your configuration. Usually there is no need to change anything here.

Download the terrain database here and generate the scenery database depending on your favourite simulation software.

To get the latest navigation data, please consider subscribing to Navigraph. (https://navigraph.com/)
Software Updates
The next step is to update ProSimA322 to the latest version.

General display setup
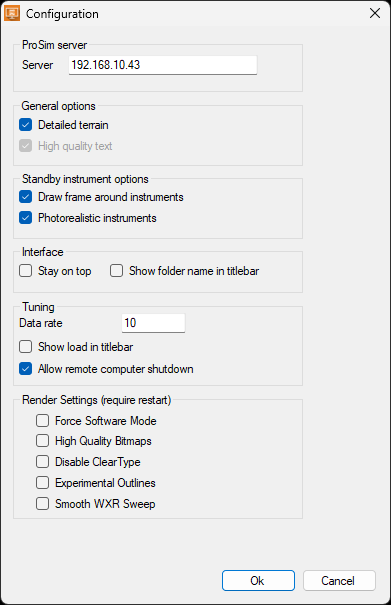
On first start of each ProSimA320 Display module instance first enter the IP address of the VISUAL-PC in the configuration. Open ProSimA320 Display, by default a black screen is displayed.

For the ease of configuration, it’s recommended to select Ground Power in the IOS and set the overhead Ground Power switch to on.
If no hardware overhead is present, use ProSimA320 Display > right mouse click > display > overhead and select ground power switch. Close the display overhead by right mouse click > close overhead. When ground power is selected the captain PFD and ND will be visible.
Hit F12 to enter the display setup mode. The display setup mode is only used during configuration, not for normal operation. In display setup mode, a blue background colour is shown, when selecting F12 once more display background colour changes back to black.

When closing ProSimA320 Display automatically all setting is saved.
You can change the position of the window using drag & drop. The size of the window can be adjusted using the mouse wheel.
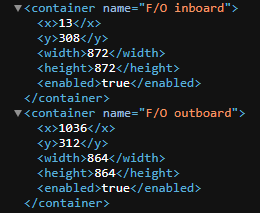
To make configuration easier for you, we have shown the corresponding values from our system for the individual displays. You can enter the configuration file in the respective ProSimA322 display folder in the "config.xml" file.
The following information is without guarantee.
Setup CPT display

Setup center display

Setup FO display

General MCDU setup
Start the MCDU and place the program on the correct windows. Make sure you don't mix CPT and F/O side. Select the settings according to the screen below.

Use the font size settings as a recommendation.
Doubleclick to change to full screen.
Setup fonts
The font sizes and font alignment can be adjusted via the "line select mode" so that the contents of the display match the buttons on the MCDU perfectly.
To start aligning the different lines open the line select mode (open ProSimA322-MCDU > right mouse click > line select mode).

The first line (LSKR1) should be lighted in a yellow square box. Align the line by using the following commands:
- Up and Down (computer keyboard entry “U” and “D”)
- Left and right (computer keyboard entry “L” and “R”)
- Wides and Shorten (computer keyboard entry “W” and “S”)
When the first line is configure select the next LSK to perform the configuration again, all until all lines are aligned correctly.

To make configuration easier for you, we have shown the corresponding values from our system for the MCDUs. You can enter the configuration file in the respective ProSimA322-MCDU folder in the "config.xml" file.

Setup of Audio
Start ProSimA322-Audio and call up the preferences.
Enter the IP address of the VISUAL-PC.

The entries in the sound output depend heavily on your configuration. If in doubt, create a group and assign all sounds to this group.

On this page, you can assign all sounds to a group (if you have more than one). You can also define an individual volume for each sound. As a rule, this is not necessary.

The sound of the simulator has great potential for immersion. Consider whether you use add-ons. You may find suggestions in our blog under "Tutorials".
Setup of IOS
Start the application and enter the IP address of the VISUAL-PC.

For advanced users: In the "Network" area, you can generate another client with which you can control the IOS. This is a particularly interesting option when using Apple devices.
We have another tip for you. To make flying more exciting, you can configure random failures of aircraft systems in the "Failures" section.

Win11 auto-login
Note: Disabling the login password reduces system security. Only use this on trusted devices.
Step 1: Enable classic login option in Registry
- Press [Windows] + [R], type regedit, and press Enter.
- Navigate to:
HKEY_LOCAL_MACHINE\SOFTWARE\Microsoft\Windows NT\CurrentVersion\PasswordLess\Device - Double-click: DevicePasswordLessBuildVersion.
- Change its value from 2 to 0 and confirm.
Step 2: Disable password prompt at startup
- Press [Windows] + [R], type netplwiz, and press Enter.
- In the User Accounts window, uncheck:
“Users must enter a user name and password to use this computer”. - Click Apply.
- Enter your current password to confirm and save.
Step 3: Optional – Remove password prompt after standby
- Open Settings with [Windows] + [i].
- Go to Accounts → Sign-in options.
- Under “If you’ve been away, when should Windows require you to sign in?”, select Never.
Step 4: Optional – Disable Windows Hello PIN
- Open Settings → Accounts → Sign-in options.
- Under Windows Hello PIN, remove your PIN and switch back to password login.
- Reapply Step 2 to keep automatic login active.
After this setup, Windows 11 will log in automatically without asking for a password.
Please note that projection setup with warping and edge blending is covered by a separate document.
Flightsimulation Software
Download your preferred flight simulation software and install it.
See the following pages for details:
Please continue with calibration of the flight controls.
